
All Lines
(These videos are same for all lines of business.)
(These videos are same for all lines of business.)
FAQ Quick Links:
Quotes, Applications, and Policies | Insureds Tab | Policy Tab | Risks Tab | Rating Tab | Billing Tab | Attachments Tab | Submit Tab
Quotes, Applications, and Policies | Insureds Tab | Policy Tab | Risks Tab | Rating Tab | Billing Tab | Attachments Tab | Submit Tab
Quotes, Applications, and Policies
How do i access a quote, application, or policy?
Quotes, applications, and existing policies can all be accessed through the Policies module. Navigate there by clicking the Policies icon located at the top of any BriteCore page.

Use the Search box to search for quotes, applications, and policies. Using policy number or insured name will be the most common search technique to find an individual quote, application, or policy.
IMPORTANT: When searching for an individual quote, application, or policy, the best practice is to have all the "status" check boxes below the search box unchecked.
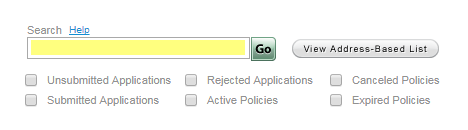
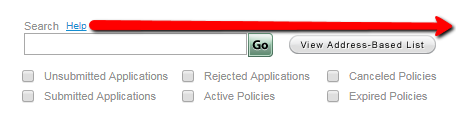
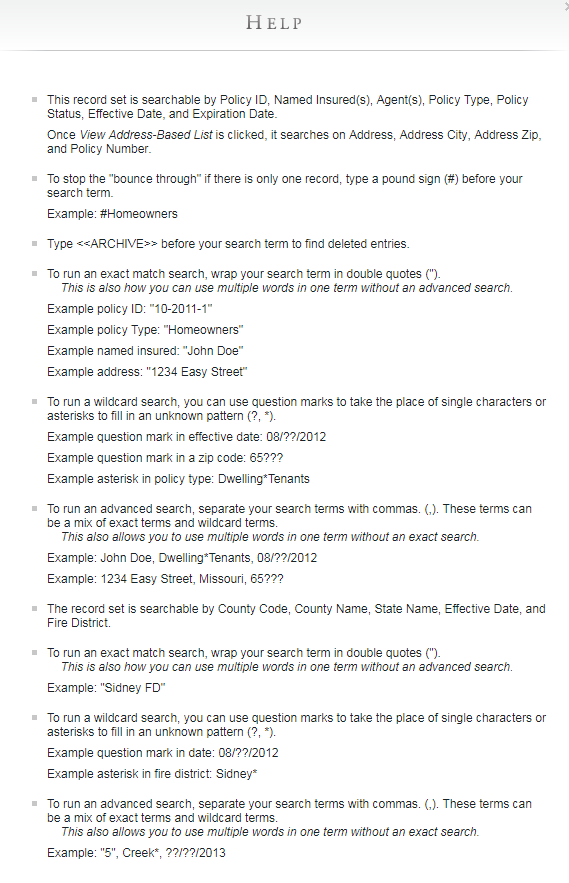
Other than searching by policy number or name, there are additional ways you can search. Click Help for more information about all the ways you can search.
|
|
how can i find all my applications, active policies, cancelled policies, or other
group of similar quotes, applications, or policies?
group of similar quotes, applications, or policies?
You can search to find a group of similar quotes, applications, or policies by utilizing the "status" check boxes below the Search box. To do so, leave the Search box blank, click one or more status check boxes, and click Go. A listing that meets the selected status will be displayed. (Hint: Leaving all boxes unchecked will show a list of all quotes, applications, and policies.)

For example, if you want to see all of your Submitted Applications, check that status box, and then click Go.
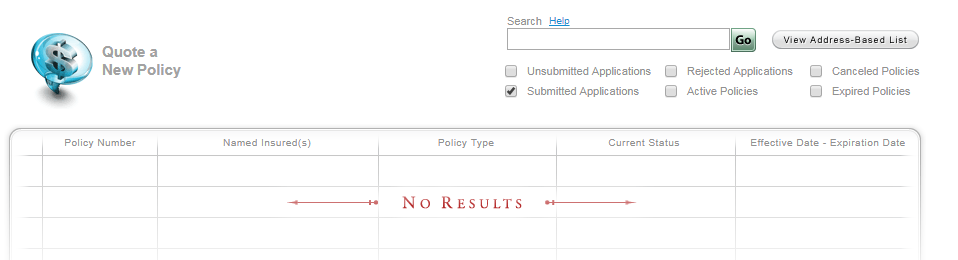
If you would like to search for all of your Unsubmitted Applications and Submitted Applications, check both status boxes click Go.
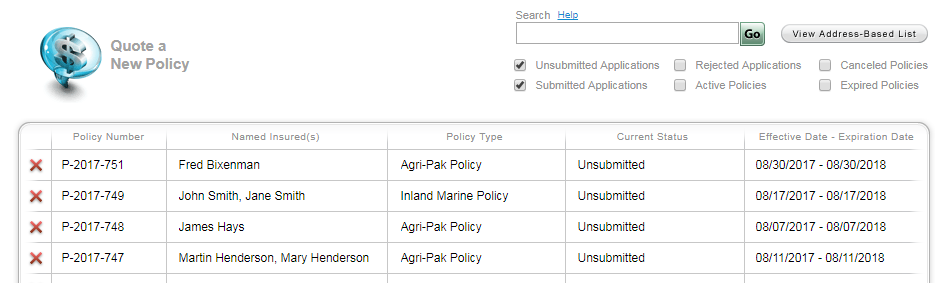
When a list is displayed, you can click anywhere in the row to access that quote, application or policy. Do not click the red "X" icon unless you want to delete that item.
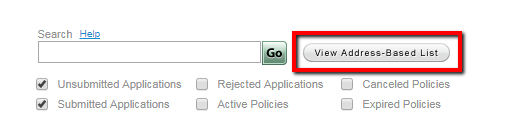
can i search by address?
You can do an address based search or view an address based list by clicking the View Address-Based List button next to the Search box. Again, click the Help link to view ways you can search by address.
How do I start a new quote?
You can start a new quote one of two ways:
1. You can click the New Quote icon from the dashboard.

2. Or if you are already in the Policies tab, you can click the Quote a New Policy icon.
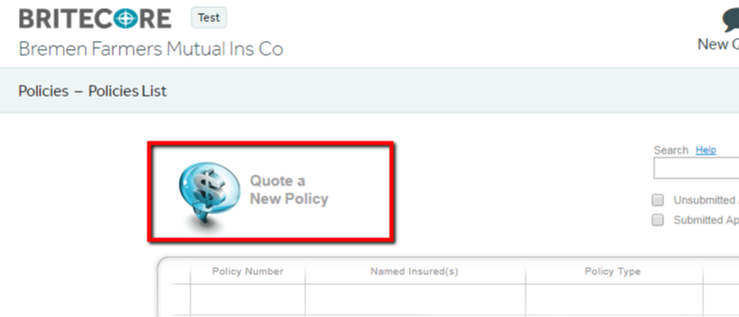
Regardless of which way you choose, you are directed to the same screen.
Insureds Tab
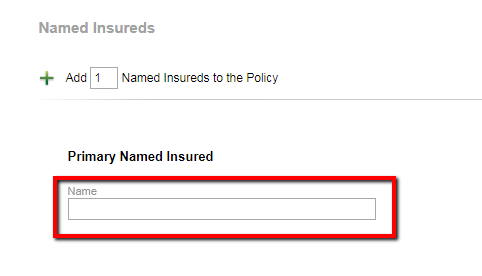
How do I add a Named Insured or Additional Interest?
From the Insured tab, click on the green "+" icon to add a Named Insured to the policy.

The same is also true for Additional Interests. Click on the green "+" icon to add. IMPORTANT: After adding the name and address, click in the Interest box to select an interest type. This additional Interest area is designed to add Additional Insureds and Alternate Payers.
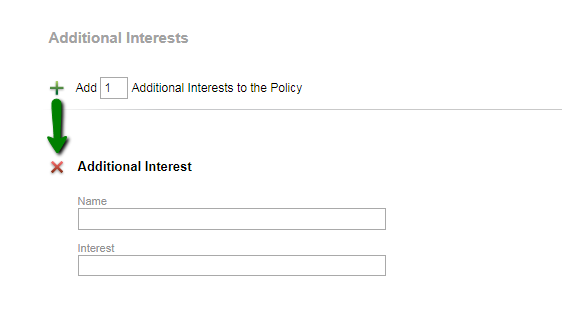
To add a name in either the Named Insured area or Additional Interest area, type the name within the box. IMPORTANT: Regarding Named Insured, there is a "one name to one box requirement" (i.e. do not type John & Jane Doe into one box. This should be split into two Named Insureds.
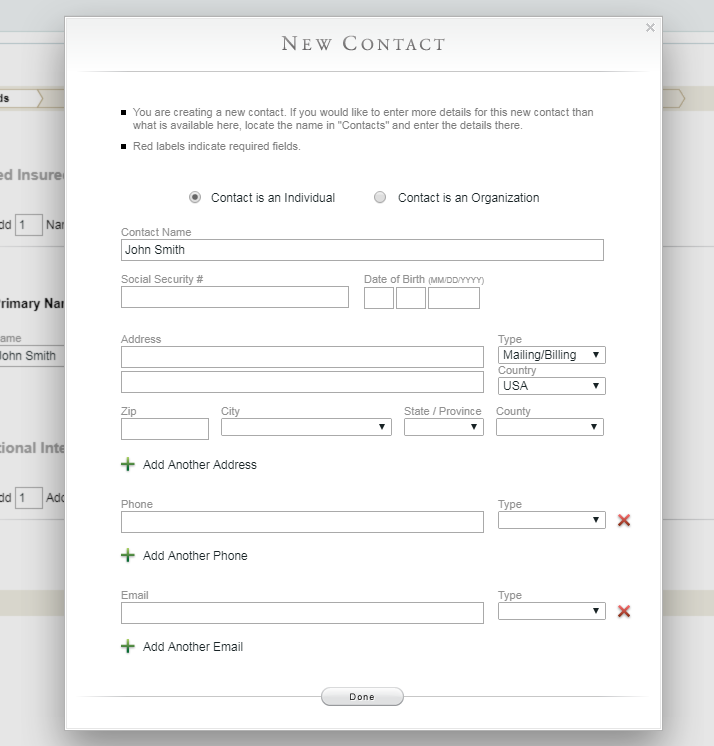
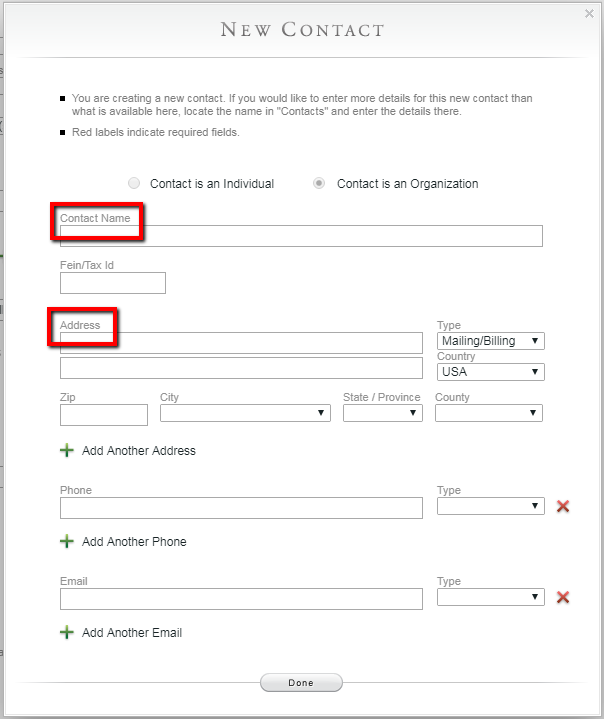
If the system cannot find a matching Name record, it will prompt you to add one when you exit the Name box. A New Contact pop-up will appear. Complete the information. The Contact Name and Address only are required. All other fields are not required and are for Agent reference.
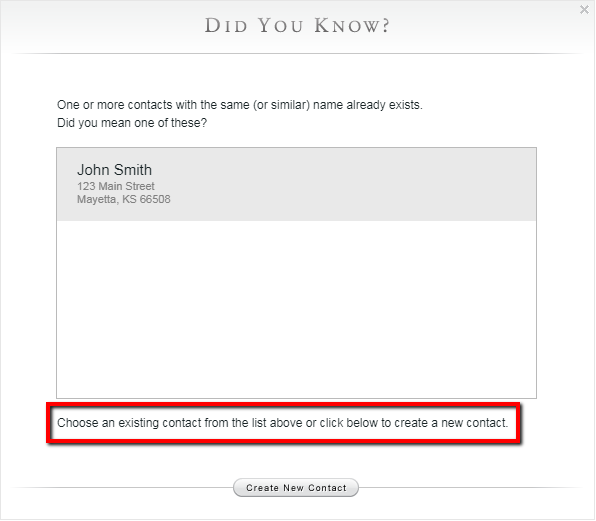
If the system recognizes the name you entered, it will offer suggestion(s) by way of a Did You Know pop-up. You may select the suggested name by clicking it.
If the suggestion is not accurate, you can use the Create New Contact button and add the name and address using the New Contact pop-up. Again, only Contact Name and Address are required on the New Contact pop-up.
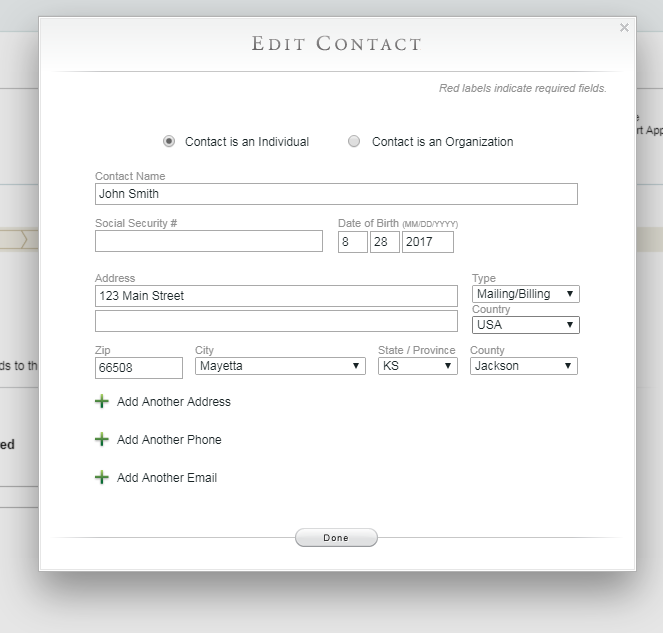
How do I edit the name or address of a named Insured or Additional Interest?
To edit any Insured information previously entered, click the Pencil icon next to the name box.
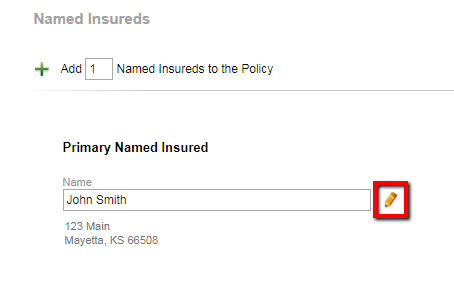
An Edit Contact pop-up will appear. In this pop-up, make the desired changes and click the Done button.
Should I add a Mortgagee or other Lienholder on the Insureds Tab?
No. Only Additional Insureds or Alternate Payers should be added in the Additional Interests area. You will add a Mortgagee in the Risks tab.
Policy Tab
How do I select the policy type of my quote?
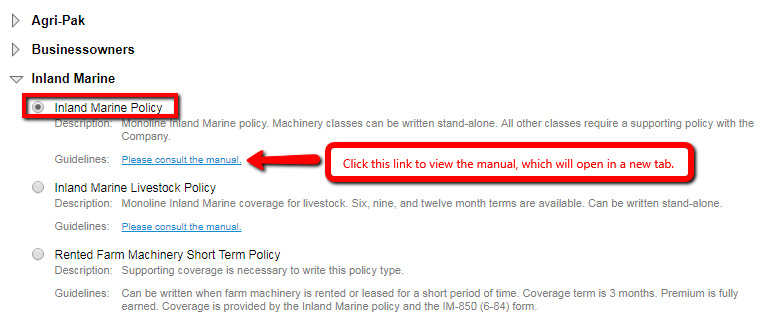
First select the type of business by clicking the grey arrow to expand.

Then, select the policy type by clicking the circle next to it. Note, you can view a PDF version of the manual by clicking the link.
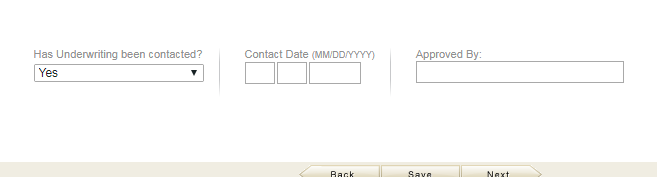
I spoke to an underwriter and received approval. How can I note this on the application?
At the bottom of the Policy tab, there is a question, Has Underwriting been contacted? Select yes and enter the date you spoke to the Underwriter. Last, click in the Approved By box and select the Underwriter with whom you spoke.
Risks Tab
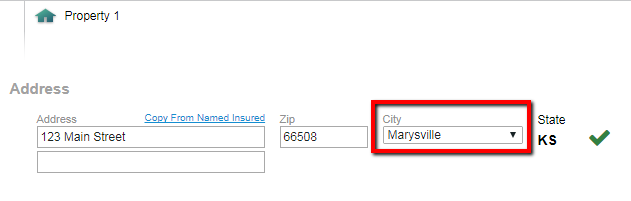
The correct City or County is not being displayed. How can I correct that?
Some Zip codes contain more than one city. After entering the Zip code, if the city is not correct, click the City box and click the correct City from the drop down list. If the correct city is not in the drop down list, contact the Company.
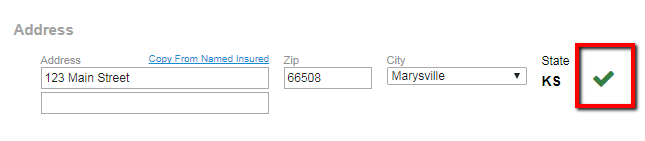
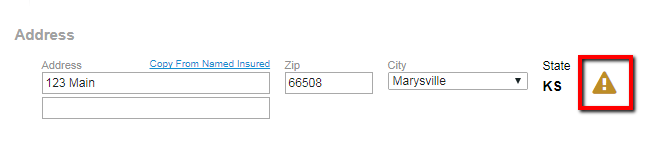
What does a green checkmark next to the address indicate? a yellow or red icon?
A green check mark is a visual queue that indicates the address could be matched against a verified database. An address with a green check mark should be the goal.
A yellow icon indicates that something might be missing from the address. For example. the word Street is missing below from the Address.
A red icon indicates the address could not be found and might be incorrect.
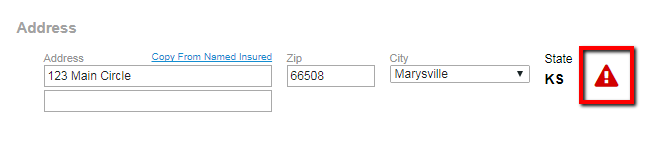
When a yellow or red icon appears, corrections should be made to the address. Again, a green check mark is the goal.
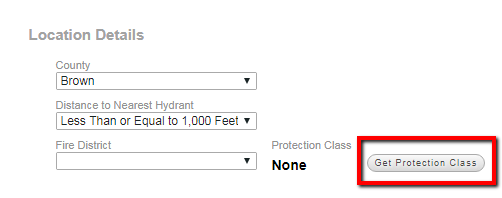
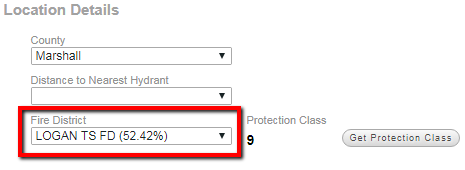
How do I find the fire protection class of a property?
In the Location Details, click the Distance to Nearest Hydrant box and click the correct value. Then click the Get Protection Class button and the system will locate the correct Fire Protection Classification.
What if an exact match for a fire protection class is not found?
If an exact match is not found, a pop-up Message will appear.
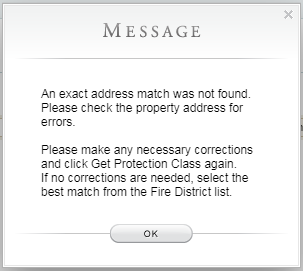
If the cause of the message was due to an inaccurate address, make the appropriate corrections and click the Get Protection Class button again.
If the address is correct, further action is needed. Click the Fire District box and select the correct fire department. Note, the fire departments are listed in order of the percentage of population they serve.
How do i add a mortgagee or other lienholder to a property?
Add a Mortgagee by clicking the green "+" icon next to Mortgagee(s).

As you begin typing in the Mortgage box, the system will auto-suggest mortgagee(s) within the system. The more you type, the narrower the list of suggestion will get. Once you find the correct Mortgagee in the list, hover your mouse over it and click to select.
If the Mortgagee does not yet exist in the system, you will receive the New Contact pop-up. In the pop-up, complete the Contact Name and Address. All other boxes can be left blank.
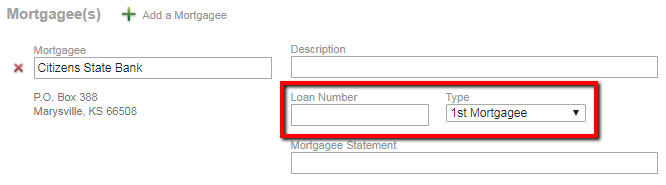
Once the correct Mortgagee has been added, you can add a Loan Number (if applicable) and select the mortgagee Type.
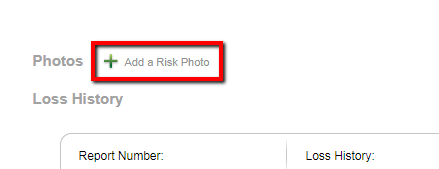
how do i add photos of the property?
Add photos of the property by using the green "+" icon next to Photos.
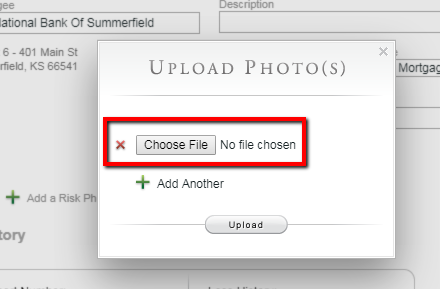
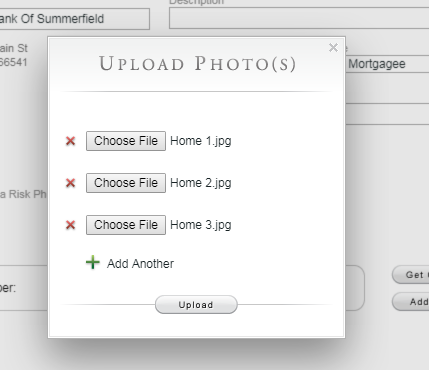
An Upload Photo(s) pop-up will appear. Click the Choose File button and locate the photo file on your computer. (If multiple photos need to be uploaded, use the green "+" icon to Add Another and repeat the process.)
IMPORTANT: When choosing your photos, remember that only image files are accepted (.jpg, .gif, .bmp, .png, and .tif). PDF files can not be uploaded in this section.
|
|
Once the file(s) has been chosen, click the Upload button.
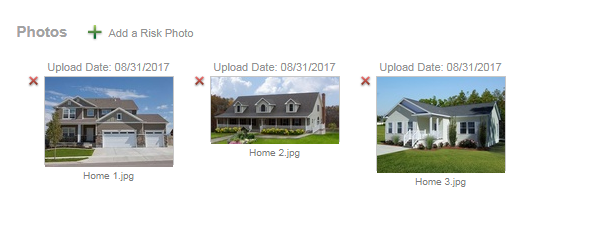
Thumbnails of the photos will then appear.
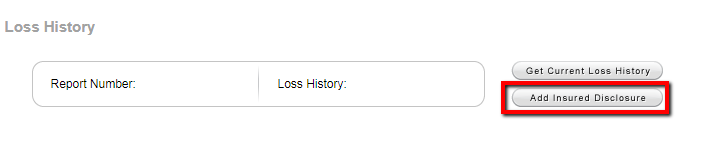
I know there has been a prior loss on the property, how do i add that?
Any loss history the insured discloses can be added by clicking the Add Insured Disclosure button in the Loss History area.
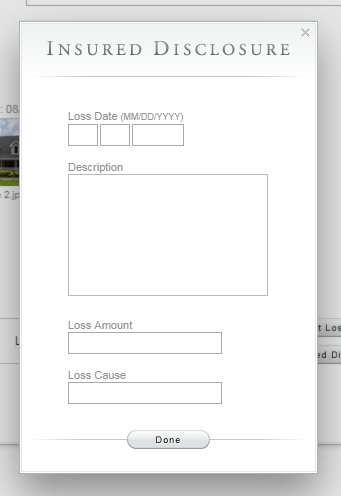
An Insured Disclosure pop-up box will appear. Complete all boxes and click Done. Repeat the process for each Loss Date.
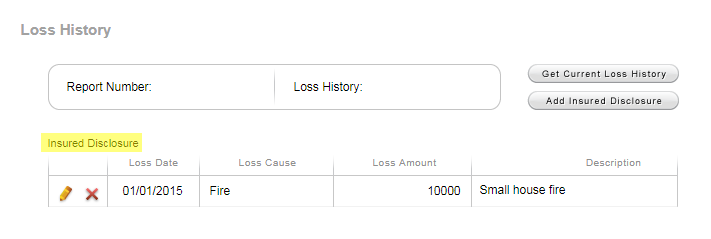
A listing of what has been entered will appear under Insured Disclosure. Use the Pencil icon to edit the information or the red "X" to delete.
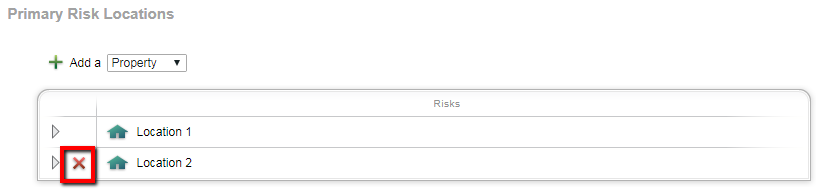
how do i add or remove a property location?
To add another property, at the top of the screen, click the green "+" icon to Add a Property.
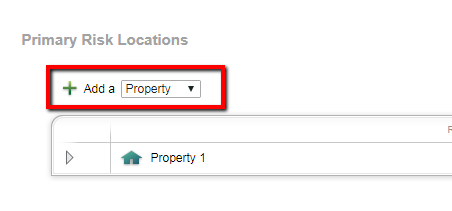
Once you add another property, click the gray arrow to expand and complete the appropriate information.
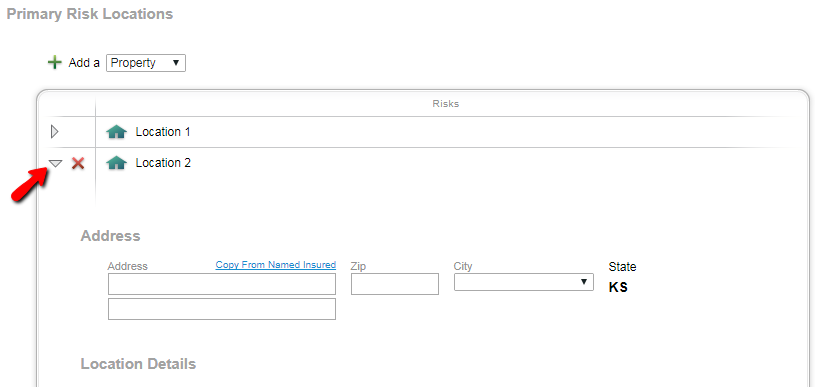
To remove a property, click the red "X" icon.
Rating Tab
View Agri-Pak Rating Tab Frequently Asked Questions
View Homeowners Rating Tab Frequently Asked Questions
View Dwelling Property Rating Tab Frequently Asked Questions
View Businessowners Rating Tab Frequently Asked Questions
View Inland Marine Rating Tab Frequently Asked Questions
View Homeowners Rating Tab Frequently Asked Questions
View Dwelling Property Rating Tab Frequently Asked Questions
View Businessowners Rating Tab Frequently Asked Questions
View Inland Marine Rating Tab Frequently Asked Questions
Billing Tab
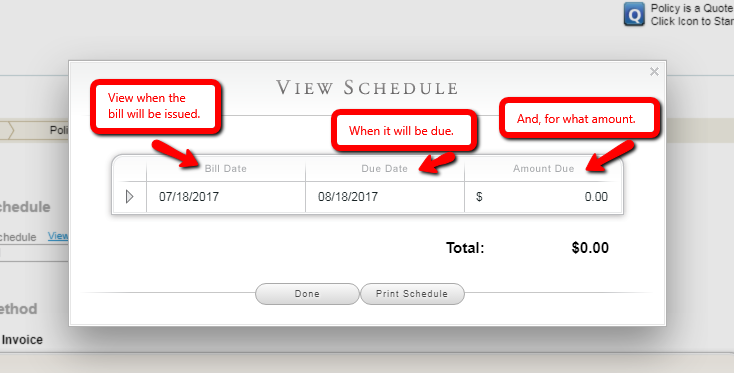
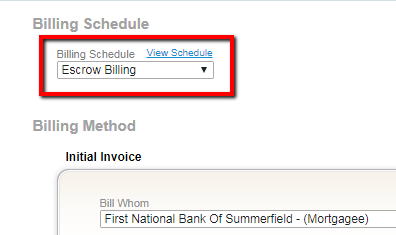
How can i select or view the desired billing schedule?
To select a billing schedule, click the Billing Schedule box and click the desired schedule in the drop down list. Note, for some lower annual premium amounts, the available schedules will be limited.

Once you have selected a billing schedule, click the View Schedule link to see the schedule breakdown. You can also print the schedule by clicking the Print Schedule button.
How do i electronically sweep the initial payment from my agency account?
First, in the Billing Method area, for the Initial Invoice, select your agency in the Bill Whom box.
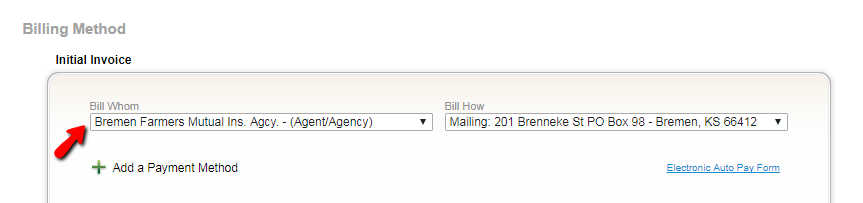
If your agency has a sweep account, it will appear. Select the account by clicking the circle next to Pay initial amount due from this account.
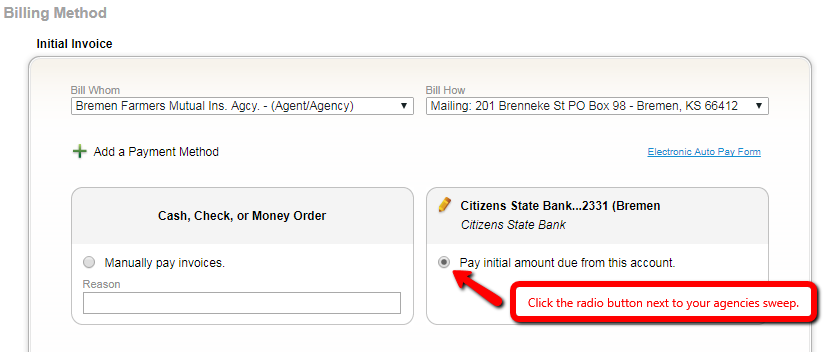
IMPORTANT: The payment will be withdrawn from the agency's bank account when the application is submitted.
How do i set up an escrowed (mortgagee billed) payment plan?
In the Billing Method area, select the Mortgagee in the Bill Whom box for both the Initial Invoice and Future Invoices.
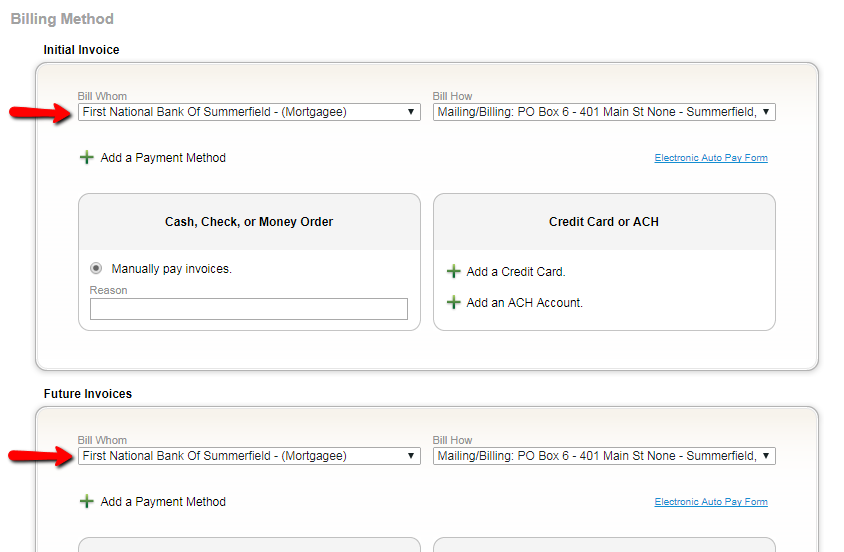
The Billing Schedule will automatically change to Escrow Billing.
IMPORTANT: With Escrow Billing no payment is due with the application submission.
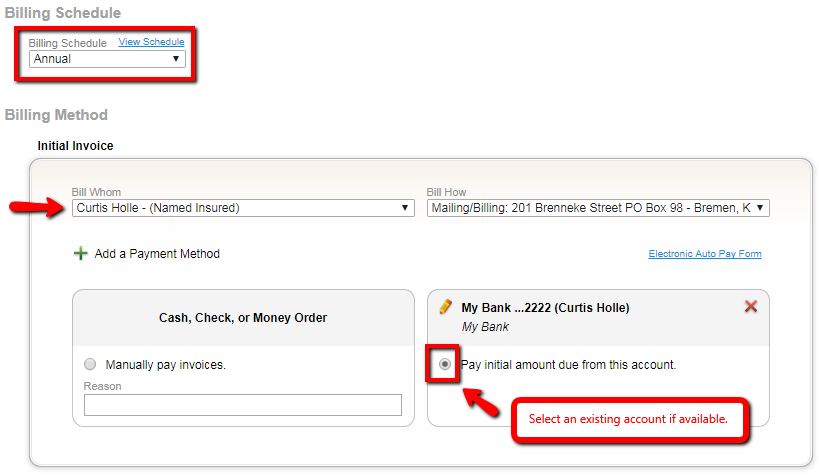
the payer wants the initial payment to be paid electronically via a bank account or credit/debit card. how do i set that up?
IMPORTANT: A 2.5% fee (minimum $3.75) will be added to the payment amount when a credit or debit card is used. Payments directly from a bank account (ACH) do not have this fee.
First, select the desired Billing Schedule. Then be sure the Named Insured is selected for the Bill Whom in the Initial Invoice area. If there is a bank account already associated with the Named Insured, you can select it by clicking the circle next to Pay initial amount due from this account.
Use the Pencil icon next to the account to make any changes to it, if necessary.
If there is not an account already associated with the Named Insured, click the green "+" icon next to Add a Credit Card to add a credit/debit card or next to Add an ACH Account to add a bank account.
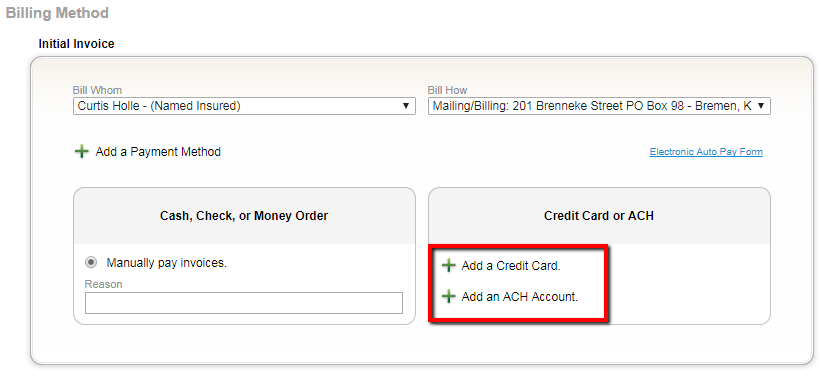
A Payment Method pop-up box will appear. Complete all information and click the OK button at the bottom.

IMORTANT: After adding the new account, you must select it by clicking the circle next to Pay initial amount due from this account.
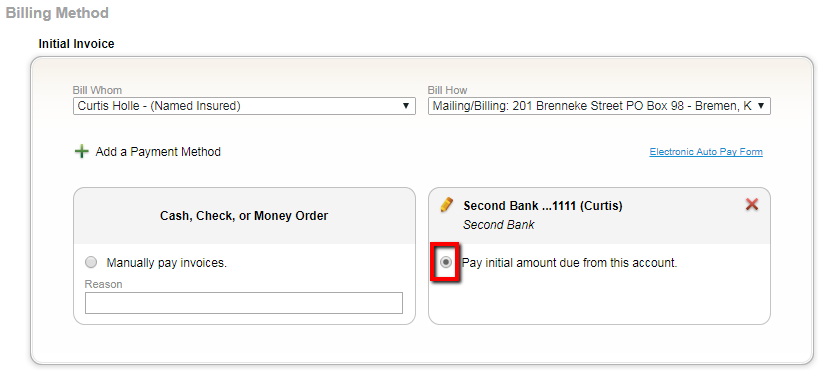
IMPORTANT: The payment will be withdrawn from the account when the application is submitted.
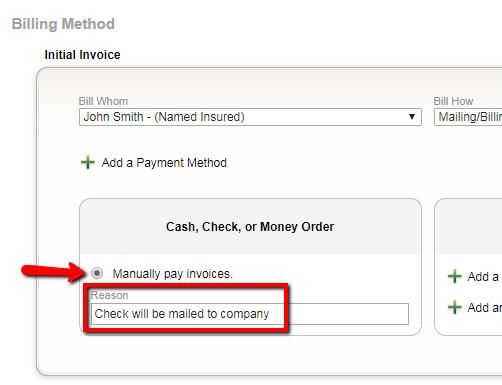
a paper check is being mailed to the company for the initial payment. How do i set that up?
In the Initial Invoice area, click the circle next to Manually Pay invoices.
IMPORTANT: In the Reason box, you must enter a reason the initial payment is being manually paid, such as "Check will be mailed to company".
IMPORTANT: In the Reason box, you must enter a reason the initial payment is being manually paid, such as "Check will be mailed to company".
an autopay billing schedule is desired. how can i access and print the authorization form?
When a recurring AutoPay Billing Schedule is selected, a pop-up Message will appear, reminding you to complete the Electronic Auto Pay Form.
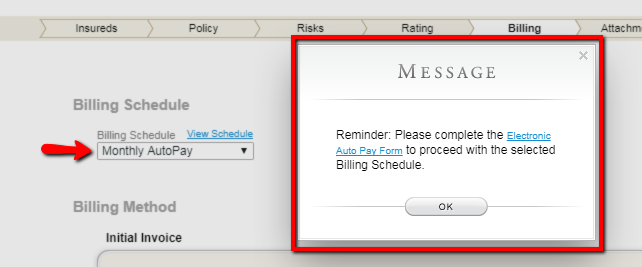
In the pop-up Message, click the blue Electronic Auto Pay Form link to open the authorization form. Print the form, complete it, and have the payer sign.
The completed form can then be uploaded to the application in the Attachments tab or it can be sent separately to the Company.

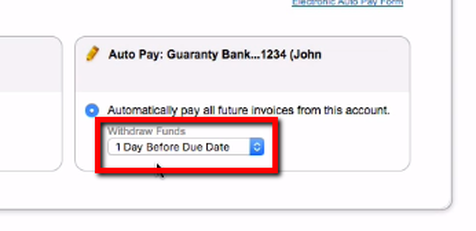
on an autopay billing schedule, can the withdraw date be altered?
You may change the draft date of the funds via the Withdraw Funds drop down.
For example, if the due date is on the 19th of every month, but you want it to withdraw on the 18th, you would choose 1 Day before Due Date.
For example, if the due date is on the 19th of every month, but you want it to withdraw on the 18th, you would choose 1 Day before Due Date.
Attachments Tab
should photos of the property be added on the attachments tab?
No. Photos of dwellings, outbuildings, and other property should be attached in the Photos section of the Risks tab.
how do i add documents, such as the autopay authorization form, to the application?
First, locate the Application Documents folder. If one does not exist, click the Add Folder button to create a new folder and name it Application Documents.
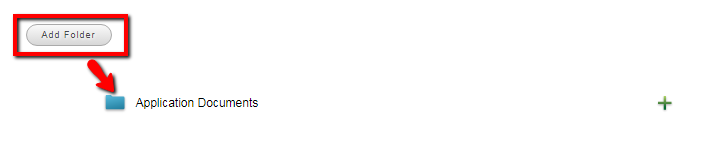
Click the green "+" icon to add files to the Application Documents folder. An Add Attachment pop-up will appear.
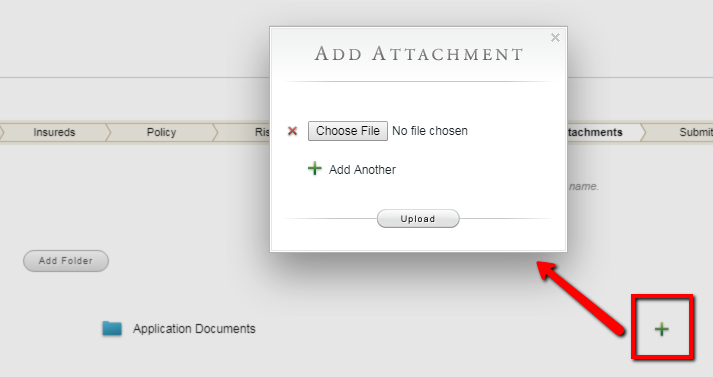
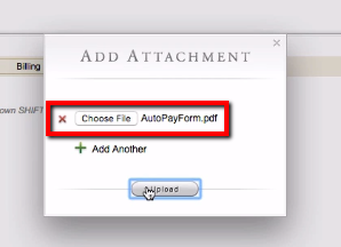
On the Add Attachment pop-up, click the Choose File button and locate the file on your computer. (If multiple photos need to be uploaded, use the green "+" icon to Add Another and repeat the process.) Once the file has been chosen, click the Upload button.
On the Add Attachment pop-up, click the Choose File button and locate the file on your computer. (If multiple photos need to be uploaded, use the green "+" icon to Add Another and repeat the process.) Once the file has been chosen, click the Upload button.
how do i view or delete a document i have attached?
To view an uploaded document, click the blue folder icon to open the folder. Then click on the file name to view the document.
To delete a document, click the red "X" icon next to the file name. Note, this can only be done on an unsubmitted application.
To delete a document, click the red "X" icon next to the file name. Note, this can only be done on an unsubmitted application.

Submit Tab
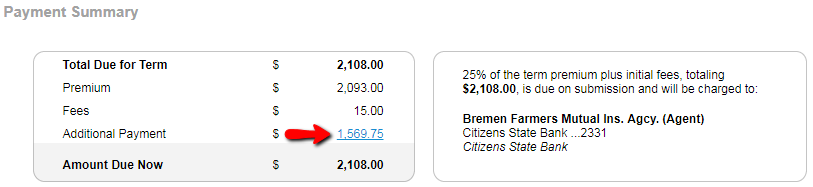
How do I change the amount of the down payment?
The default down payment amount in BriteCore is 25% of the annual premium plus the initial policy issue fee, even if the Annual Billing Schedule has been selected.
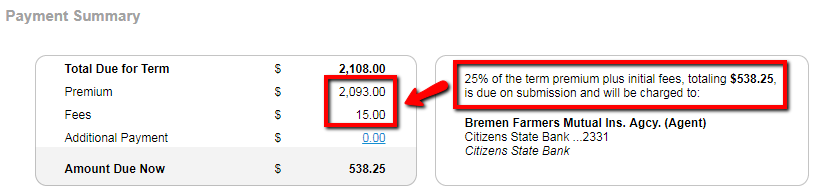
However, it is possible to pay the full annual amount when submitting the application. To do so, click the blue 0.00 next to Additional Payment.
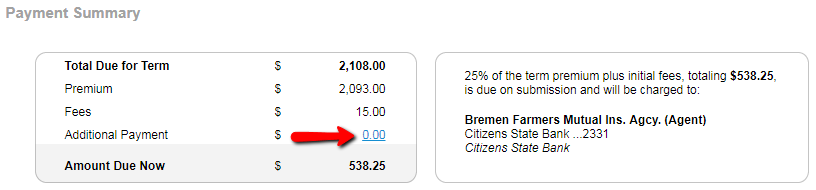
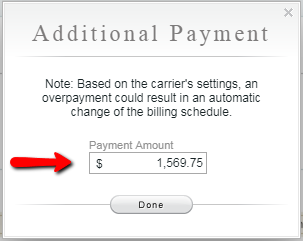
After clicking 0.00, an Additional Payment pop-up will appear. Enter the additional amount to be submitted. (The amount you enter here will be added to the down payment amount.) Click the Done button when finished.
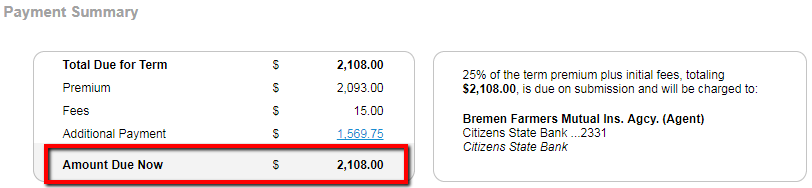
After completing the Addition Payment pop-up, you can verify the amount that will be submitted with the application.
To change the Additional Payment amount, simply click the amount in blue and change the amount in the Additional Payment pop-up.
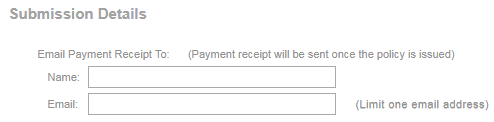
Can i email a receipt for the initial payment to the insured or other payer?
Yes, but it is not required. You can do this in the Submission Details section. Enter the name of the payer and their email address.
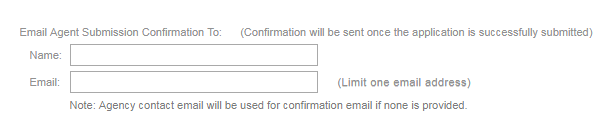
can i email a copy of the application to MYSELF or other agency staff?
Yes, you may send a copy to yourself or other Agency staff by entering your/their name and email in the Submission Details section.
how do i print the application?
To print, click the Print Application button at the bottom of the Submit tab.

IMPORTANT: Review the application, print, and gather signatures.
how do i submit the application?
Click the Submit Application button to submit. If there are any errors or missing data, you will receive a message at this time directing you to make corrections.

If there are no errors, click the OK button on the Confirm pop-up to submit the application to the carrier.

i do not see the submit application button. What is wrong?
Only licensed Agents have the ability to submit applications. If you do not see the Submit Application button, your User ID likely only has Customer Service Representative permissions. If you feel this is an error, please contact the Company.
an error message appears when i click submit application. What do i do?
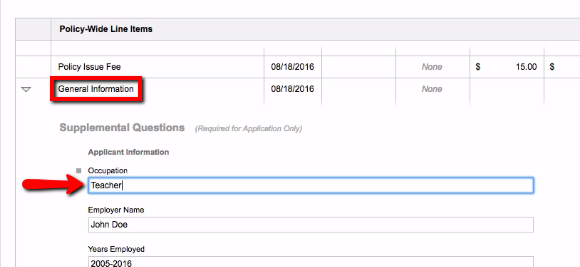
An Error message here generally means an Underwriting question was not answered. The Error pop-up will indicate which questions were left unanswered. Click OK on the Error pop-up and navigate to the unanswered question.
For example, in the below Error message, you can see that in the Rating tab, under General Information, the Occupation question was not answered.
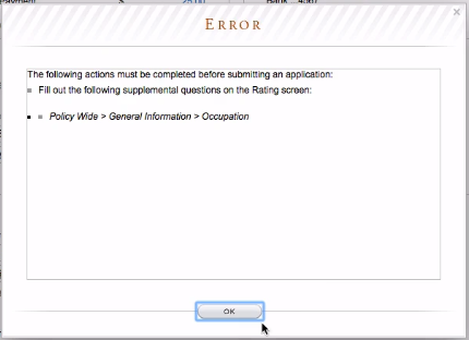
By navigating back to the Rating tab and scrolling down to General Information, you can add the Occupation.
Once all errors have been corrected, you can proceed back to the Submit tab and click the Submit Application button again.